
Gimana sih gan meaning? There may be questioned like that? Gini, I'll explain a little bit, right my blogspot domain i.e.. blogspot.com, while freenom has a free domain is shorter and nicer. ga, .ml, .TK and. cf. so the previous domain, e.g. domain in blogspot that you guys make is tsucommunity.blogspot.com, can you guys replace with tsucommunity.ga or tsucommunity.tk and other free domain from freenom.
Connecting/installing the domain freenom belongs to the blogspot is easy, because freenom has the fastest DNS servers update speed compared to the service provider hosting and domains that existed in Indonesia. Maybe in 2-5 minutes the domain freenom can already be used, while in Indonesia requires a period of 1-5 Minutes to connect their domain to blogspot.
Apasih point is connected?
See panjanganya blogspot said, makes people difficult to remember domain name. The following seems to me the advantage to connect/install freenom to the blogspot domain:
Memorable people, because the domain belongs to the short (ga, tk, et al)
Support for creating an account google adsense non hosted
More simple and more elegant
More cool
Add insights and more.
Next, let's find out how to connect the freenom to the free blogspot domain:
1. open the freenom Account has been created
2. Open Account blogspot (blogger) and enter the menu settings
3. in the menu basic settings, set up 3rd party URLS for Blog, right under my blogspot domain.

4. next, enter the domain name freenom which I have created www.tsucommunity.ga, and then click Save.

5. Then will appear the error URL, then copy one by one to Manage DNS Host Name in Freenom.

Open Freenom, My Domains--Manage domains and Manage > Freenom DNS

For Type Select CNAME TTL, not have modified the target then the contents of the corresponding target Host Name as shown below:


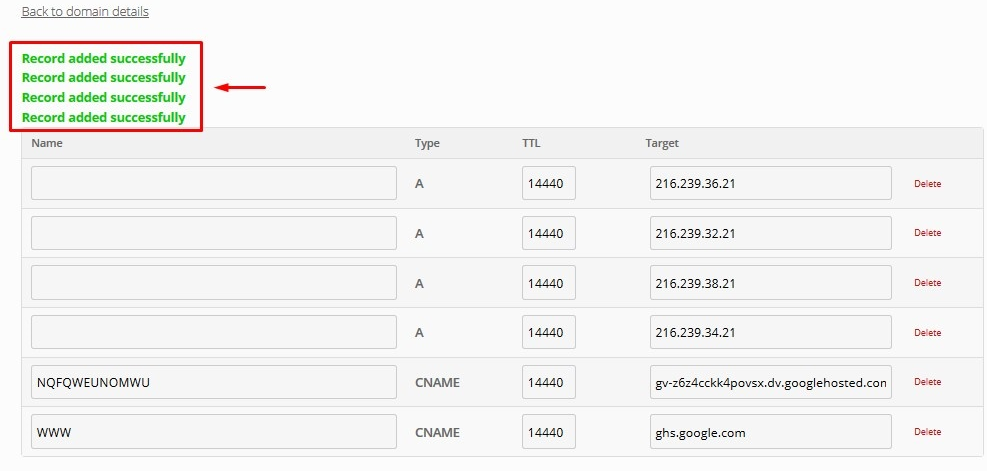
6. After that, enter the Google IP Records. Google IP'S as follows:
- 216.239.32.21
- 216.239.34.21
- 216.239.36.21
- 216.239.38.21
Enter the IP of the target column. With Type = A. Like the picture below.

Next click Save, if all true then the notification will appear Successfully.
7. Go back to blogger, after settings finished, wait 2-5 minutes. Then save the changes to the domain. If it is still an error, wait a few minutes and save again.

8. If the domain has changed, then edit it back 3rd party domain and check the domain switch you, e.g. tsucommunity.ga to www.tsucommunity.ga. It aims when someone access without www in front, then automatically direct direct to www. Be sure to save it again.


9. The installation of the domain has managed to please you can try to check the domain www.tsucommunity.ga
Thus, the tutorial on how to install a free Domain Freenom to Blogspot, hopefully can add to the knowledge you guys in the world blogspot. The authors expect to friends to disseminate this good article on social media or blogspot you guys with notes jotted down the source of this article. Good luck!
If you're looking for a reputable contextual ad company, I recommend that you take a look at ExoClick.
ReplyDelete